一、資料庫安裝
-
至Mariadb官網下載安裝來源設定檔
-
將該檔上傳至主機
-
執行來源安裝檔
-

-
安裝mariadb-server
yum install mariadb-server
Erasing : 1:mariadb-libs-5.5.64-1.el7.x86_64 14/14 Verifying : MariaDB-server-10.4.13-1.el7.centos.x86_64 1/14 Verifying : MariaDB-compat-10.4.13-1.el7.centos.x86_64 2/14 Verifying : perl-Net-Daemon-0.48-5.el7.noarch 3/14 Verifying : boost-program-options-1.53.0-28.el7.x86_64 4/14 Verifying : MariaDB-client-10.4.13-1.el7.centos.x86_64 5/14 Verifying : lsof-4.87-6.el7.x86_64 6/14 Verifying : MariaDB-common-10.4.13-1.el7.centos.x86_64 7/14 Verifying : 1:perl-Compress-Raw-Zlib-2.061-4.el7.x86_64 8/14 Verifying : perl-Compress-Raw-Bzip2-2.061-3.el7.x86_64 9/14 Verifying : perl-DBI-1.627-4.el7.x86_64 10/14 Verifying : perl-IO-Compress-2.061-2.el7.noarch 11/14 Verifying : perl-PlRPC-0.2020-14.el7.noarch 12/14 Verifying : galera-4-26.4.4-1.rhel7.el7.centos.x86_64 13/14 Verifying : 1:mariadb-libs-5.5.64-1.el7.x86_64 14/14 Installed: MariaDB-compat.x86_64 0:10.4.13-1.el7.centos MariaDB-server.x86_64 0:10.4.13-1.el7.centos Dependency Installed: MariaDB-client.x86_64 0:10.4.13-1.el7.centos MariaDB-common.x86_64 0:10.4.13-1.el7.centos boost-program-options.x86_64 0:1.53.0-28.el7 galera-4.x86_64 0:26.4.4-1.rhel7.el7.centos lsof.x86_64 0:4.87-6.el7 perl-Compress-Raw-Bzip2.x86_64 0:2.061-3.el7 perl-Compress-Raw-Zlib.x86_64 1:2.061-4.el7 perl-DBI.x86_64 0:1.627-4.el7 perl-IO-Compress.noarch 0:2.061-2.el7 perl-Net-Daemon.noarch 0:0.48-5.el7 perl-PlRPC.noarch 0:0.2020-14.el7 Replaced: mariadb-libs.x86_64 1:5.5.64-1.el7 Complete!
二、防火牆設定
-
新增3306port 的服務
firewall-cmd --add-port=3306/tcp --perm -
重啟防火牆
firewall-cmd --reload
三、主資料庫設定
-
啟用Mariadb
#systemctl enable mariadb Created symlink from /etc/systemd/system/mysql.service to /usr/lib/systemd/system/mariadb.service. Created symlink from /etc/systemd/system/mysqld.service to /usr/lib/systemd/system/mariadb.service. Created symlink from /etc/systemd/system/multi-user.target.wants/mariadb.service to /usr/lib/systemd/system/mariadb.service. #systemctl start mariadb
-
建立root密碼或變更管理者密碼 1或2任選一個
1.mysql_secure_installation 過程說明: 輸入root密碼,預設為空 設定root密碼[Y/n]?不要為了方便跟OS的root相同… 移除匿名使用者[Y/n]?Y 是否禁止root遠端登入[Y/n]?Y,建議禁止 刪除測試用資料[Y/n]?Y 重新載入權限[Y/n]?Y 2.mysqladmin -u root password

-
修改/etc/my.cnf
#vi /etc/my.cnf加入以下設定
[mysqld]
server-id=1
log_bin=master-bin
binlog-ignore-db=mysql
binlog-ignore-db=information_schema
binlog-ignore-db=performance_schema
binlog-ignore-db=test
innodb_flush_log_at_trx_commit=1
binlog_format=mixed
備註:此配置一定要在[mysqld]之下
重啟服務
#systemctl restart mariadb -
新增備份帳號 登入mariadb
#mysql -u root -p Enter password: Welcome to the MariaDB monitor. Commands end with ; or \g. Your MariaDB connection id is 10 Server version: 10.4.13-MariaDB MariaDB Server Copyright (c) 2000, 2018, Oracle, MariaDB Corporation Ab and others. Type 'help;' or '\h' for help. Type '\c' to clear the current input statement. MariaDB [(none)]>
新增備份帳號bkuser
MariaDB [(none)]>grant replication slave on *.* to 'bkuser'@'%' identified by '123456';
Query OK, 0 rows affected (0.005 sec)
-
秀出master現況
MariaDB [(none)]>show master status\G
*************************** 1. row ***************************
            File: master-bin.000001
        Position: 329
    Binlog_Do_DB:
Binlog_Ignore_DB: mysql,information_schema,performance_schema,test
1 row in set (0.001 sec)
四、從資料庫設定
-
前面一、二、三、1.2.都依照前面所述 ,依樣畫葫蘆
-
修改/etc/my.cnf
[mysqld]
server-id=2
relay-log-index=slave-relay-bin.index
relay-log=slave-relay-bin
relay_log_recovery=1
重啟mariadb
#systemctl restart mariadb -
設定同步主資料庫 進入mysql
#mysql -u root -p Enter password: Welcome to the MariaDB monitor. Commands end with ; or \g. Your MariaDB connection id is 10 Server version: 10.4.13-MariaDB MariaDB Server Copyright (c) 2000, 2018, Oracle, MariaDB Corporation Ab and others. Type 'help;' or '\h' for help. Type '\c' to clear the current input statement. MariaDB [(none)]>
先停用slave
MariaDB [(none)]>stop slave;設定同步主資料庫資訊
MariaDB [(none)]>change master to
                 master_host='192.168.7.132',        <-master資料庫主機IP
                 master_user='bkuser',               <-前面三4設定的備份帳號
                 master_password='123456',           <-前面三4設定的備份帳號密碼
                 master_log_file='master-bin.000001',<-前面三5所查出的檔名編號
                 master_log_pos=329;                 <-前面三5所查出的LOG編號
啟用slave
MariaDB [(none)]>start slave;
-
秀出slave現況
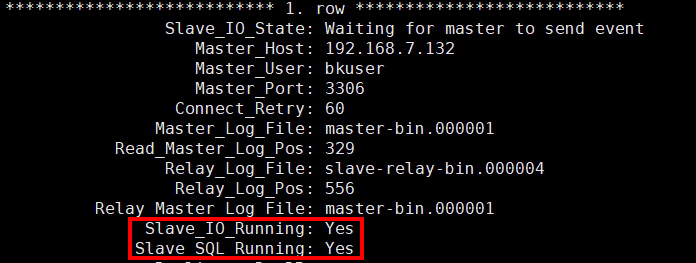
MariaDB [(none)]> show slave status\G
*************************** 1. row ***************************
                Slave_IO_State: Waiting for master to send event
                   Master_Host: 192.168.7.132
                   Master_User: bkuser
                   Master_Port: 3306
                 Connect_Retry: 60
               Master_Log_File: master-bin.000001
           Read_Master_Log_Pos: 329
                Relay_Log_File: slave-relay-bin.000004
                 Relay_Log_Pos: 556
         Relay_Master_Log_File: master-bin.000001
              Slave_IO_Running: Yes
             Slave_SQL_Running: Yes
               Replicate_Do_DB:
           Replicate_Ignore_DB:
            Replicate_Do_Table:
        Replicate_Ignore_Table:
       Replicate_Wild_Do_Table:
   Replicate_Wild_Ignore_Table:
                    Last_Errno: 0
                    Last_Error:
                  Skip_Counter: 0
           Exec_Master_Log_Pos: 329
               Relay_Log_Space: 865
               Until_Condition: None
                Until_Log_File:
                 Until_Log_Pos: 0
            Master_SSL_Allowed: No
            Master_SSL_CA_File:
            Master_SSL_CA_Path:
               Master_SSL_Cert:
             Master_SSL_Cipher:
                Master_SSL_Key:
         Seconds_Behind_Master: 0
 Master_SSL_Verify_Server_Cert: No
                 Last_IO_Errno: 0
                 Last_IO_Error:
                Last_SQL_Errno: 0
                Last_SQL_Error:
   Replicate_Ignore_Server_Ids:
              Master_Server_Id: 1
                Master_SSL_Crl:
            Master_SSL_Crlpath:
                    Using_Gtid: No
                   Gtid_IO_Pos:
       Replicate_Do_Domain_Ids:
   Replicate_Ignore_Domain_Ids:
                 Parallel_Mode: conservative
                     SQL_Delay: 0
           SQL_Remaining_Delay: NULL
       Slave_SQL_Running_State: Slave has read all relay log; waiting for the slave I/O thread to update it
              Slave_DDL_Groups: 0
Slave_Non_Transactional_Groups: 0
    Slave_Transactional_Groups: 0
1 row in set (0.001 sec)
看到紅框的部份都出現Yes , 表示已經連上master,並且開始同步
五、驗證
-
於master新增資料庫及資料 登入master
#mysql -u root -p
Enter password:
Welcome to the MariaDB monitor.  Commands end with ; or \g.
Your MariaDB connection id is 10
Server version: 10.4.13-MariaDB MariaDB Server

Copyright (c) 2000, 2018, Oracle, MariaDB Corporation Ab and others.

Type 'help;' or '\h' for help. Type '\c' to clear the current input statement.

MariaDB [(none)]>
新增一個資料庫
MariaDB [(none)]>CREATE DATABASE ICW01;
Query OK, 1 row affected (0.002 sec)
進入ICW01後再新增一個資料表
MariaDB [(none)]> USE ICW01;
Database changed
MariaDB [ICW01]> CREATE TABLE my_table ( data  varchar(255))
    -> ENGINE=InnoDB DEFAULT CHARSET=utf8;
Query OK, 0 rows affected (0.027 sec)
再新增一筆資料備查
MariaDB [ICW01]> INSERT INTO my_table (data) VALUES ('I will be  successful!');
Query OK, 1 row affected (0.006 sec)
再秀一下master狀態
MariaDB [ICW01]> show master status\G
*************************** 1. row ***************************
            File: master-bin.000001
        Position: 850
    Binlog_Do_DB:
Binlog_Ignore_DB: mysql,information_schema,performance_schema,test
1 row in set (0.001 sec)
發現LOG已經增加為850
-
於slave去查詢master所新增的資料 登入slave
#mysql -u root -p
Enter password:
Welcome to the MariaDB monitor.  Commands end with ; or \g.
Your MariaDB connection id is 10
Server version: 10.4.13-MariaDB MariaDB Server

Copyright (c) 2000, 2018, Oracle, MariaDB Corporation Ab and others.

Type 'help;' or '\h' for help. Type '\c' to clear the current input statement.

MariaDB [(none)]>
秀slave狀態
MariaDB [(none)]> show slave status\G
*************************** 1. row ***************************
                Slave_IO_State: Waiting for master to send event
                   Master_Host: 192.168.7.132
                   Master_User: bkuser
                   Master_Port: 3306
                 Connect_Retry: 60
               Master_Log_File: master-bin.000001
           Read_Master_Log_Pos: 850
                Relay_Log_File: slave-relay-bin.000004
                 Relay_Log_Pos: 1077
         Relay_Master_Log_File: master-bin.000001
              Slave_IO_Running: Yes
             Slave_SQL_Running: Yes
發現它已經自動同步到850
再秀一下現有的資料庫
MariaDB [(none)]> show databases;
+--------------------+
| Database           |
+--------------------+
| ICW01              |
| information_schema |
| mysql              |
| performance_schema |
| test               |
+--------------------+
5 rows in set (0.002 sec)
發現ICW01 已經出現在資料庫列表之中
再去查詢裡面的資料是否正確
MariaDB [(none)]> use ICW01;
Reading table information for completion of table and column names
You can turn off this feature to get a quicker startup with -A

Database changed
MariaDB [ICW01]> select * from my_table;
+------------------------+
| data                   |
+------------------------+
| I will be  successful! |
+------------------------+
1 row in set (0.001 sec)